milk&honey cafe

Tuesday, December 23, 2008

Christmas Bake-a-thon: Madeleines

madeleines

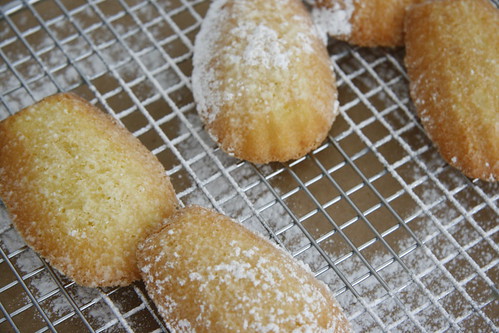
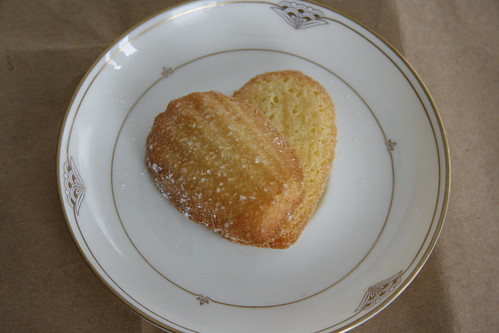
OH! What a fantastic morning! I woke up fairly early (and I use that word "early" quite lightly) and decided to do it. Do what? Bake Madeleines once and for all. I couldn't believe I've had that gorgeous Madeleine pan for months and months but haven't used it...till this morning! These pretty little scalloped babies are my sister's favorite and mine too. It's hard to see them in any North American bakery, but they are quite popular in Seoul, Korea (and France, I'm assuming). These soft "cookies" are more like mini sponge cakes and have a variety of flavors, from lemon to rosewater to lavender. All in all, they are perfectly elegant, perfectly delightful, perfectly perfect.

madeleines

madeleines
madeleines

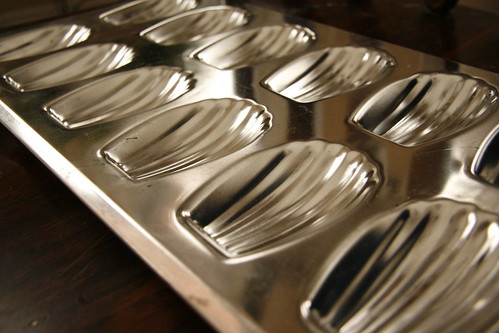
Anywho, I've searched for the perfect recipe for many a months, but never tried any of them. I don't know, to be honest, I think I was scared to make them, in fear that it will ruin my idea and love for the perfect Madeleine. What if turns out to be a disaster? But today I decided to brave it all and bust out the beautiful aluminum pan I bought at Williams-Sonoma a while back. No longer shall it be just a pretty novelty piece of mine!

madeleines
madeleines

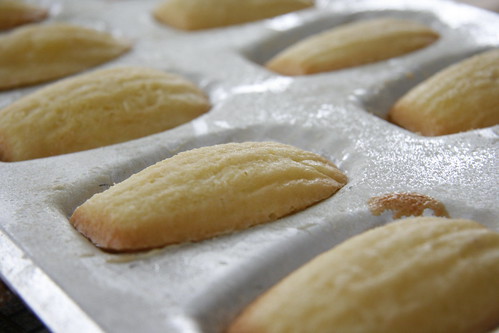
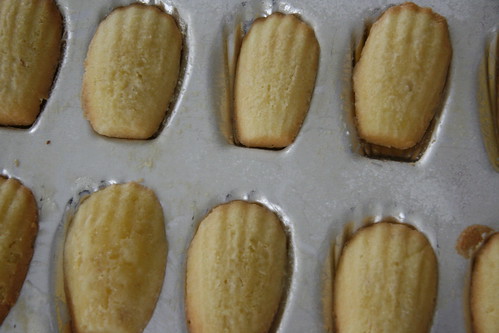
So there is the backdrop. :P Recipe time: I decided to use the recipe from 101 Cookbooks. Something about her I trust completely. She seems to know what she's doing. And yup! She did not disappoint. The recipe is fairly easy and simple but required a new technique for me (Brown Buttering.. I burned my first pot of butter. Eeek.) And I was extremely nervous.. But when they came out of the oven I had a big big smile! The smell was great, the texture was great, the scalloped ridges were great. They are fluffy and spongy and light. The flavor is perfect lemony-sweet. Oh and did it compliment a cup of tea fantastically!

madeleines

I sound a bit excited, but these are worth being excited for! I can't believe I've recreated THE Madeleine! It's a big deal for me. :D And I can't wait till my mom comes home so that I can bake it for her and her friends for afternoon tea or something! It will surely be a hit. So Madeleines are my new "thing" now! Love it!

madeleines

Lemon Madeleines

makes 2-3 dozen Madeleines
from 101 Cookbooks


ingredients

1 1/2 sticks unsalted butter (6 ounces)
2 tablespoons softened unsalted butter (for greasing pan)
3/4 cups unbleached all-purpose flour
4 large eggs
a pinch fine-grain sea salt
2/3 cups sugar
zest of one large lemon
1 teaspoon vanilla extract
powdered sugar
a bit of extra flour for dusting baking pan

Special equipment: A madeleine baking pan, regular or small Metal pans are way better (and cooler) than silicon pans. They say that the ridges are more defined and give a golden hue.


directions

1. Preheat oven to 350 degrees Fahrenheit.

2. Melt the 1 1/2 sticks of butter in a small pot over medium heat until it's brown and gives off a deliciously nutty aroma, roughly 20 minutes. OKAY. This part. 20 minutes was way too long for me, because by 15 minutes, my butter was burnt and toasted. The second time I did it I reduced it to about 10-12 minutes.Strain (using a paper towel over a mesh strainer) - you want to leave the solids behind. Cool the butter to room temperature. By doing the butter first you can complete the rest of the steps while it is cooling.

3. While the melted butter is cooling, use the remaining 2 tablespoons of butter to grease the madeleine molds - get in there and make sure you get in all the ridges. Dust with flour and invert the pan tapping out any excess flour. Lanha uses "cooking spray" with flour to simplify this part.

4. Put the eggs with the salt in the bowl of an electric mixer with a whisk attachment. Whip on high speed until thick - you are looking for the eggs to roughly double or triple in volume - approximately 3 minutes. Continuing to mix on high speed, slowly add the sugar in a steady stream. Whip for 2 minutes or until mixture is thick and ribbony. Now with a spatula fold in the lemon zest and vanilla (just until mixed).

5. Sprinkle the flour on top of the egg batter, and gently fold in. Now fold in the butter mixture. Only stirring enough to bring everything together.

6. Spoon the batter into the molds, filling each mold 2/3 –3/4 full. I use a small cup filled with batter to keep things clean and manageable, it is easier than using a spoon.

7. Bake the madeleines for 12 - 14 minutes (7-10 minutes for smaller cookies), or until the edges of the madeleines are golden brown. Remove from oven and unmold immediately. Cool on racks and dust with powdered sugar.


madeleines

Monday, December 22, 2008

New Colours

cobb salad

So I used to be a salad lover. That was back when I cared lots about nutrition and fitness (aka "before I became a baker" haha). But then I ate too much that I got sick of it. The occasional restaurant salad would satisfy me, but home salads? Yuck! I would usually make one with much effort, but then only eat a quarter of it. I would buy fresh salad ingredients, but then let it go un-fresh because I never felt like making it. And so I am no longer a salad lover.

cobb salad

But there are three salads that I love. Three salads that make me smile and tickle my taste buds. And being quite filling, I would rarely feel unsatisfied after a bowl of salad. (Mostly because they are piled with lots of protein, which is good for you, by the way). The three salads are Cobb salad, Salad Niçoise, and Wild Mushroom Arugula salad. So I thought I would remake these at home and maybe for those of you who are like me and have grown to dislike salads, it will be an invitation to try out the leafy delight again.


cobb salad

This salad here is the Cobb Salad. It's quite similar to the Chef's Salad. It was created in the mid-1920's by restaurateur Bob Cobb at his Brown Derby Restaurant in LA. How do I know this, you ask? Well, it's because I have a cookbook! I borrowed Joy of Cooking's "All about salads and dressings" and got the recipe here. I actually substituted a lot of it with my own ingredients, and it looked quite similar to the Chef Salad. But anyway. I love the array of flavors and textures in the salad. It has tons of protein to fill you up: boiled egg, chicken, bacon, cheese! Lots of fat (good fats) to make you happy: cheese, avocado, olive oil. And enough greens for a clean taste: bibb lettuce, watercress, green onions.

cobb salad

One of the key key KEY things about a good tasting salad is that it is not soggy with water, or with dressing. A salad spinner is great for a crisp tasting salad. I was happy when I got this for two reasons: one, obviously because it dries herbs and greens really fast, and two, cuz it's just so fun using it! And it's important not to soak and drench the salad with dressing. Yuck. You want it to be enough to flavor and combine the different ingredients -- not overpower it. But anywho, enough words and explanations, here is the recipe. For my substitutions and notes, it is written in italics.

cobb salad


Cobb Salad

4-6 servings
from Joy of Cooking: All About Salads & Dressings


ingredients

1 garlic clove, peeled
1/4 tsp salt
1/3 cup red wine vinegar I ran out of it, so I used Balsamic Vinegar, which was just fabulous!
1 tbsp fresh lemon juice
1/3 cup Roquefort or other blue cheese, crumbled I found the mildest blue cheese I could find. My sister isn't the biggest fan of blue cheese.
salt and ground black pepper to taste
2/3 cup olive oil

1 head Bibb lettuce, separated into leaves, washed, and dried
1 large bunch watercress, tough stems trimmed, washed, dried, and coarsely chopped.
1 ripe avocado, peeled and diced
4 to 6 diced cooked chicken or turkey breast I just used sliced cooked turkey breast from the deli
6 to 8 slices bacon, cooked until crisp and crumbled I really don't like bacon, so I used sliced smoke ham from the deli instead
3 hard boiled eggs, diced
3 medium tomatoes, coarsely chopped
1/4 cup finely snipped fresh chives I am a huge lover of green onions. So I used them instead
1/4 cup crumbled Roquefort or other blue cheese


directions

1. Mash togethr the garlic and 1/4 tsp of salt in a small bowl until a small paste is formed. Whisk in the vinegar, lemon juice, 1/4 cup cheese, salt and pepper (to taste). Add olive oil in a slow, steady stream, whisking constantly. Make sure you do this correctly so that the dressing will combine together and not separate and get all oily.
2. Line a platter with the Bibb lettuce. Arrange on top of the lettuce leaves the rest of the ingredients, in a manner where each of the ingredient is grouped side by side.
4. Lightly drizzle the vinegar over the salad and serve.


cobb salad

Sunday, December 21, 2008

Christmas Bake-a-thon: Lemon Squares

Hello hello.
Okay. Today it's going to be a short and sweet one. These were the second goodies that I baked for the church Christmas get-together thing but I have to admit, I didn't like them. I definitely over-baked them so the filling was too stiff and egg-y. Not enough lemony zing and the shortbread was too mushy. This was a new recipe, so I think I'll stick with my original ones. Anyway, enough complaining. :P Please enjoy the pictures. :) No recipe today.

lemon bars
lemon bars
lemon bars

Saturday, December 20, 2008

Christmas Bake-a-thon: Pecan Bars

pecan bars

Pecan bars are deadly...yet fabulous! I don't mean to scare you right off the bat, but the amount of butter and sugar and butter that goes into it? Yikes! You have to blame a lot of it on the pecans too, though. Pecans themselves are buttery calorific delights. But what can I say? They are just too darn delicious.

pecan bars

Now that I have cleared that out of the way, I found this version from Martha Stewart's Cookies. This recipe was created by John Barricelli (Martha's baking man that occassionally shows up on her show too) and I think they were a great choice for this baking occasion. My church asked for some baked goodies for the Christmas get-together thing and after a pretty traditional lunch (turkey and cranberries and ham) I thought nothing better than to finish it off with pecan pie...bars!

pecan bars

Make sure you keep your shortbread dough crumbly and not overbeaten, so that it would give a nice crumbly and soft texture.

pecan bars
pecan bars
pecan bars

I think I might have done something wrong or different than what was supposed to be done for the pecan filling part. In the picture of the book, the pecan filling is very glossy and full, but mine became quite dull after a day and less caramel-y looking. And.. the recipe call for a 9x13" pan, but it seemed that there was not enough filling. The pecans were quite bare for some of the parts. I'm not sure but maybe if I make it again, I might increase ever so slightly the filling amount (while keeping the pecans the same).

pecan bars

But the flavor was definitely all there. It was nutty and buttery and caramel-y and delicious! Mmm! And they smelled great!! People really liked these babies. (I saw one lady take about 5 pieces) Haha! Definitely will make this again.

pecan bars

Pecan Bars

Makes about 4 dozen pieces
from Martha Stewart's Cookies


ingredients

for the crust:
1 cup plus 2 tbsp (2 1/4 stick) unsalted butter, room temp
3/4 cup packed light brown sugar
1/2 tsp salt
3 cups AP flour

filling:
1/2 cup (1 stick) unsalted butter
1/4 cup packed light brown sugar
1/4 cup plus 2 tbsp honey
2 tbsp granulated sugar
2 tbsp heavy cream
1/4 tsp salt
2 cup (8 oz) pecan halves
1/2 tsp pure vanilla extract


directions

1. Preheat oven to 375F. Make crust: Put butter and brown sugar into a bowl on an electric mixer fitted with the paddle attachment; mix on med speed until light and flufy. about 2 minutes. Mix in salt. Add flour, 1 cup at a time, mixing until fully incorporated after each addition. Continue mixing until dough to come together in large clumps.

2. Press dough about 1/4" thick into a 9 x 13" baking pan. Pierce the dough with a fork. Chill until firm, about 20 minutes. Bake until golden brown, 18-20 minutes. Transfer to a wire rack to cool completely. Reduce oven to 325F.

3. Make filling: Place butter, brown sugar, honey, granulated sugar, and heavy cream in a sauce pan over high heat. Bring to a boil, stirring constantly until mixture coats the back of a spoon, about 1 minute. Remove pan from heat; stir in salt, nuts, and vanilla. Pour filling into the cooled crust.

4. Bake until filling bubbles, 15 to 20 minutes. Carefuly transfer to a wire rack to cool completely. Run a paring knife around edges of the pan and invert onto cooling rack. Invert again onto a cutting board. Use a sharp knife to cut into 1 by 3 " bars. Bars can be stored in an airtight container at room temp up to 1 week.


pecan bars

Okay and a random last picture. This is the view outside my door. Us Torontonians got a severe snow fall alert (which is why I stayed in all day, baking!). And boy did it snow out there. It piled up quite a bit. I mean, you can't help but admire the white fluffy sparkly stuff outside, but dear-oh, shoveling? Shoveling makes it not worth it no more. :( No more!

Thursday, December 18, 2008

Christmas Bake-a-thon: Traditional Shortbread

Alritey. An exciting week has begun! Looks like we're going to have a bright white Christmas this year! And as I have decided to give out most of my Christmas gifts through baked goodies, it looks like it'll be a warm and sweet Christmas as well.

shortbread and tea

So I planned to bake a few cookies over the week and by Sunday I will wrap em up and hand it out to my friends. What is the best cookie to start off the Holiday season? Of course of course, traditional shortbread! Shortbread is a delectable Scottish cookie once served only at Christmas and New Year's Eve. But of course, why save the delicious cookie for only those two occasions? But since I am occasionally a traditional girl, I am baking these delightful tender-crisp cookies just in time for the holidays. Muhaha.

shortbread and tea

These babies are really easy to make and you need only five basic ingredients I am positive you already have in your pantries. Here is a very simple recipe.

plain + simple shortbread

Makes 12 wedges
from Jann Johnson's book, Shortbread


ingredients

1/2 cup (1 stick) unsalted butter, softened
1/3 cup sugar
1/4 tsp salt
1 tsp vanilla extract
1 cup all purpose flour


directions

1. Preheat oven to 300 degrees F. Lightly butter an 8-in round pan (or for myself I had a nonstick pan which gave very easily), or use an ungreased or parchment-lined baking sheet.
2. In a medium bowl, with an electric mixer on low or with a wooden spoon, beat the butter until light in colour, about 1 minute. Gradually mix in the sugar, salt and vanilla. Scrape down the sides of the bowl with a rubber spatula. Gradually mix in the flour until just combined.
3. Press the dough evenly into the pan, and use the back of a soup spoon to smooth the surface of the dough. Or, pat the though into an 8" round on the baking baking sheet and decoratively score or flute the edges. Prick the dough attractively with a fork.
4. Bake in the center of the oven for abotu 45 minutes, or until just golden around the edges. Place the pan on a wire rack and let the shortbread cool completely. Transfer the shortbread to a cutting board. With a sharp, thin knife, cut into 12 wedges.


Hehe. I've borrowed a few cookie books from the Library. But sometimes I find it hard to trust all the recipes a cookbook offers. I've had a few bad turn outs.. but I guess that's the fun of it all - searching for THE best cookie recipe. :)

cookie books

Monday, December 08, 2008

Sweet as a cake ball

cake balls

What's round, bite-sized, and ridiculously sweet? Yes! A cake ball! In celebration of the end of my fall semester and in welcoming the wonderful holidays, I have baked round morsels of sweetness for the church kids and of course, myself. It seemed like a perfectly delightful idea. Moist cake mixed in with delicious cream cheese frosting that is rolled into a ball, which is then enrobed with smooth chocolate. These cake balls are quite the fad right now. It's been made quite popular by the blogger Bakerella and even appeared on the Martha Stewart Show with her cupcake shaped cake pops (cake balls on a stick) and lots of people have been doing it. Anyways, I decided to just go with the simple chocolate ones as my first try.

20081206_999_13
20081206_999_33

Oh but was I in for a surprise. Let me tell you, bakerella really makes it look easy. Her balls are perfect and her photos are flawless and so it sounded easy enough.

But dear-oh! It is a lot of work. I wanted to make two batches (about 100-120 cake balls) to take it for the church kids on Sunday. But ended up with a sore back and bare cake balls still waiting in the freezer to be clothed by chocolate. I mean, it doesn't seem all that hard. You bake the cake. Make the frosting. Mix the two. Roll the sticky mix into balls. Freeze them until hard. Melt your chocolate. Dip and enrobed with chocolate. Let sit and harden. But if only it was this easy. It is a messy, tedious and long process. It takes a lot of hand-done work and waiting and stirring and rolling and washing hands ever 5 minutes.

20081207_999_3
cake balls

Okay.. Maybe I'm being a bit too hard on the cake balls. I am indeed embarrassed to complain about work involved, because which delicious food is ever easy? It all takes HEART work. And I am proud of this. But I guess it's just a warning to anyone who wants to try it. Or maybe you would do a much much better job than me! :)

cake balls

Another surprise was the intensity of the sweetness. Triple wammy goodness = triple wammy sweetness. Oh indeed sweet it is. You don't quite notice it when you just eat one. It is still sweet but you can wash it out with a glass of milk or water. Oh but if you dare to have more than one, your stomach will turn sour. The kids loved it! These sweet balls were greeted delightfully by the kids and possibly blamed for them bouncing off the walls this Sunday. Hehe.

cake balls

In any case, though, I do not give up on these balls. Next time I make it (and there will be a next time!) I will use a less sweet recipe for the cake, maybe a dark devil's chocolate with less sugar or a red velvet, and much much less sugar in the cream cheese frosting. The frosting is there really just for softening and moistening the cake. I think i can even cut the frosting amount to half to three quarters because they were too sticky to work with anyway. And hopefully I'll be a bit more patient in dipping the balls in the chocolate so they'll turn out prettier.

Anyways. All in all, it was a great learning experience. And fun, of course!

cake balls